
It’s that time of the week!
Your De Jong Duke (DJD) is starting to look a little worse for wear, and the main screen is showing a “Rinse Brewer with Tablet” error message. It’s time for a deep clean!
In this comprehensive office coffee machine guide, we will cover:
- Supplies needed to service the DJD
- Disassembly
- Inserting the deep clean tablet
- Reassembly
- Test pouring after deep clean
- Removing bean hoppers and powder canisters
Supplies needed to service the DJD
Before we get right into it, let’s make sure we gather all the supplies we need to run a full and complete deep clean. These include:
- Crafty provided Cafiza tablets
- Paint brush
If you do not have either of these supplies, reach out and we will make sure those get supplied to your site ASAP!
Disassembly
Before we begin the deep clean, we need to disassemble and get all the small washable pieces out of the machine.
- Step 1: Unlock the door and place the Green Service Key into its lock.
- Step 2: Dump and rinse both the internal drip tray and waste bin.
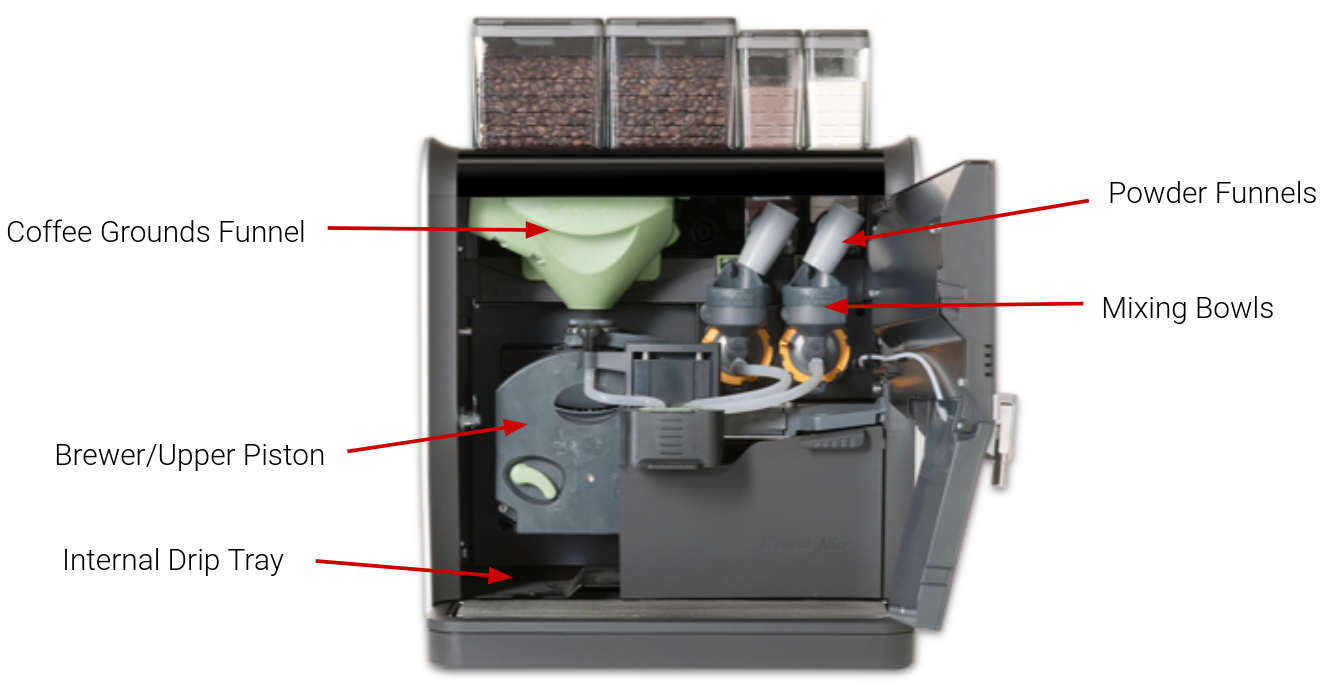
- Step 3: Remove all light gray and green pieces (besides the coffee funnels, these only need to be cleaned once a month). These pieces include the powder funnels, steam trap filter, mixing bowls, whipper blades, and bayonet catches.
- Step 4: Remove brewer and unlock the upper piston. Make sure the red o-ring is on the upper piston. Sometimes, the red o-ring gets stuck under the gray Open/Close knob. Warning: If you lose the red o-ring, the DJD will not make coffee drinks properly.
- Step 5: Soak the upper piston, steam trap filter, and any pieces that are extra dirty in hot water while you rinse the remaining pieces with hot water only (no soap should ever be used!) before drying them off with a paper towel.
- Step 6: Using your paint brush, clean the inside of the DJD by brushing off any coffee grounds and wipe up any messes inside the machine, including the inside of the door.
- Step 7: Reinstall upper piston into the brewer and insert the brewer into the DJD, making sure it locks in place. You will hear a click when it locks in.
Insert the deep clean tablet
- Step 1: Place a cleaning tablet into the brewer (see picture below), close the door, and put a large receptacle or cup underneath the coffee (left) spout.
- Step 2: Access the Service Screen (you can remove the Green Service Key and reinsert it to pull up the Service Screen) and press “Weekly Deep Clean” then “Press here to begin deep clean”.
- Step 3: The DJD will now go through its deep clean cycle which lasts 8 minutes. Once it has completed the cycle, make sure to dump the receptacle or cup and wipe out the grounds bin with a paper towel. Make sure to lock the door and you’re done!
Warning: If you do not keep the DJD on a consistent deep clean schedule, the DJD will display “Rinse Brewer with Tablet”. After 48-hours displaying this message, the DJD will lock itself and prevent people from making coffee drinks.
Reassembly
Put back all light gray and green pieces you originally took out including the powder funnels, steam trap filter, mixing bowls, and bayonet catches.
When installing the whipper blades, please make sure the arrow points to the flat part of the metal rod.
Testing after deep clean
After your deep clean cycle is completed, ensure that the DJD is functional by testing a drink with the door open to see the functions of the machine.
- Step 1: Place the green key into the lock. Exit the service menu and return to the main screen (with the door open and green key inserted). You can get to the main menu by pressing the “Quit” button on the top left of the screen, and then pressing the “Return to main menu” option that pops up.
- Step 2: Place a cup underneath the dispenser and select 1-2 different drinks to test (to activate the cup holder sensor, close the door or place a cup on the cup holder when making a drink with the door open).
- Step 3: Observe the machine preparing drinks, making sure there is no liquid dripping inside throughout the process. After ensuring everything is functioning properly, dispose of the beverages, remove the green key, close the door, and lock the machine.
- Step 4: The final part of the deep clean is wiping down the exterior of your DJD. This includes the top of the bean/powder canisters, wiping down the top of the Duke with the lid closed, and making sure the cup holders and splash wall is clean. Congratulations, you’ve finished a deep cleaning on your DJD!
Removing bean hoppers and powder canisters
Once a month, you should be more thoroughly cleaning out the DJD to make sure any spilled powders and or beans are being removed and everything is sparkly clean!
- Step 1: Pull the green handle (directly under the bean hopper you want to remove) towards you until you hear a “click”.
- Step 2: Do not skip this step otherwise beans might spill everywhere! Double check that the green handle is pulled all the way towards you by pulling it again.
- Step 3: Lift the bean hopper upward, holding it by the base of the hopper and place it on a steady surface. Note: Remove the hoppers once a month to clean behind them, clearing all beans and powder that may have fallen. This is not only good practice, but helps our technician out if the DJD needs to be looked at or repaired.
- Step 4: Once you are ready to put the bean hopper back, make sure to pay extra close attention to align the 4 spikes on the grinder house with the 4 holes on the bean canister itself. Warning: If you do not place the bean hopper back properly, the hopper will become jammed and difficult to remove.
- Step 5: Push the green handle away from you allowing the beans to fall into the grinder. Warning: If you forget to push back the handle, the beans will not fall into the grinder and the machine will pour hot water only when someone tries to make a cup of coffee or shot of espresso.
- Step 6: Check for any spilled powders behind and around the powder canisters. The easiest way to remove the powder canisters is to flip the funnels upside down and pull the canister towards you. To reinstall a powder canister, push it back slowly and ensure that the canister is flush on the shelf.
Warning: If a powder canister is not pushed back all the way, the motor will not dispense the powder OR if you forget to turn the funnels back to their original position (see far left picture) the machine will pour hot water only.