Replacing Your Kegerator Gas Tank
Step-by-step instructions for safely swapping out your gas tank for cold brew, kombucha, beer, and more.
What is a gas tank?
The gas tank powers your kegerator, pushing liquid from the keg to the tap using CO₂ or nitrogen. Without gas, your taps won’t pour—so when you’re out, it’s time for a quick swap.
How does replacing the gas tank create a better pantry experience?
Changing the tank yourself minimizes downtime and keeps your beverages flowing without waiting for a tech visit. It’s quick, easy, and satisfying—no service request required.
How do I replace my kegerator gas tank?
Here’s everything you need to do the swap:
You’ll need:
- Wrench
Step-by-step:

- Close the gas tank
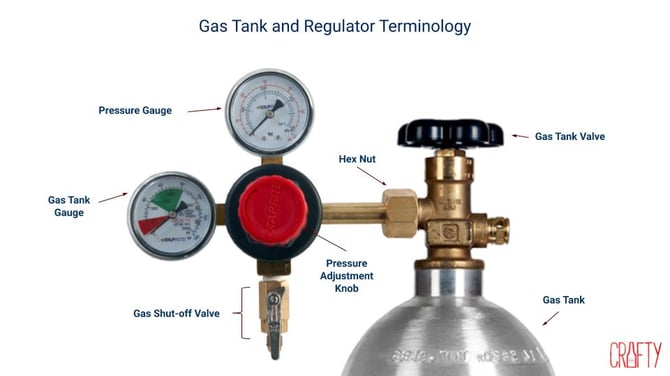
Turn the Gas Tank Valve clockwise until it’s fully closed. - Turn off the shut-off valve(s)
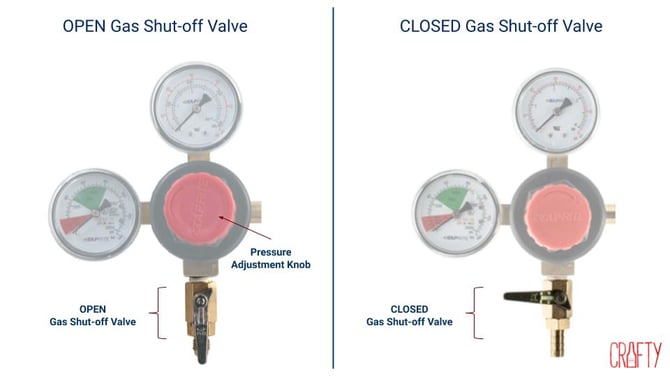
Flip the shut-off valve(s) so they’re perpendicular to the tubing. Most setups have one or two. - Disconnect the regulator
Use your wrench to loosen the hex nut by turning it counterclockwise. This will detach the regulator from the tank. - Attach the new tank
Remove the orange safety cap from your new gas tank. Tighten the regulator onto the new tank by turning the hex nut clockwise. - Open the gas tank
Turn the Gas Tank Valve counterclockwise. If you hear a hissing sound, tighten the connection at the hex nut on the gas line between the coupler and the regulator —this indicates a leak. - Adjust PSI and reopen the shut-off valve(s)
Set the desired PSI using the Pressure Adjustment Knob or Screw. Then flip the shut-off valve(s) back so they’re parallel to the tubing. - You're done!
Great job. Enjoy your beverages—you're keeping the good times flowing.

Scenarios where gas tank replacement is most helpful
- Your tap suddenly stops dispensing (usually mid-pour).
- PSI gauge reads zero or below recommended levels.
- You want to avoid waiting for a technician.
FAQs
What if I hear gas hissing after replacing the tank?
That usually means the regulator isn’t tight enough. Turn off the tank, re-tighten the hex nut with your wrench, then try again.
Do I need any tools besides a wrench?
Nope! Just a standard wrench is all you need for this job.
How do I know when it’s time to change the tank?
Check your pressure gauge—if it’s near zero or your beverages aren’t dispensing, it's time for a swap.
Still need help?
Reach out to Support@craftydelivers.com or submit a service request.
